Tuesday, November 27, 2018

How to Measure Your Space- Step 2


Post 2/2 in the series How to Measure Your Space

Step Two- Add furnishings
Now that your room is drawn, pull out your furniture templates.  If you are using software, you can draw these items or drag and drop their ready-made pieces into the drawing.  If you have neither templates nor a software program, you can draw the furniture pieces on the plan by hand.  Start placing the furniture pieces you need and play with the arrangement.  Measure any existing pieces that you will be using in the new space and incorporate them in your plan.  For any new pieces you will be buying, try incorporating different sized furniture items to see what size works best for your desired layout.  Lastly, go in and add your area rug based on the furniture you’ve put in the space (more on how to determine the size/placement coming up in a later post).

Take some time to space plan a couple of layout options for your room. Play around with furniture placement and get comfortable with creating varying arrangements. How does it feel? If you aren’t certain about what you’re doing, it's okay.   You can come back to the space plan and make changes as often as you like during the planning process.


In the end you should have a layout that resembles these examples:


Check back next week for tips on area rug placement. This is the #1 misstep we see people make in their spaces.  You won't want to miss this post!

Tuesday, November 20, 2018


HAPPY THANKSGIVING WEEK!


I just wanted to take a moment and let you know how grateful we are for you.  We appreciate you reading our posts and contacting us with feedback.  It is such a pleasure to interact with you online and share our knowledge with each of you.  We hope you have a wonderful holiday!  We are spending the next few days with our families, but we'll be back next week with the conclusion of the "how to measure your space" series.

-Liz, and the team at PDR Interiors

Tuesday, November 13, 2018

How to Measure Your Space- Step 1

Post 1/2 in the series How to Measure Your Room

Items you’ll need:
-Tape measure
-1/4” Graph paper
-Pencil
-Camera (phone will work just fine)
-Scale/ruler
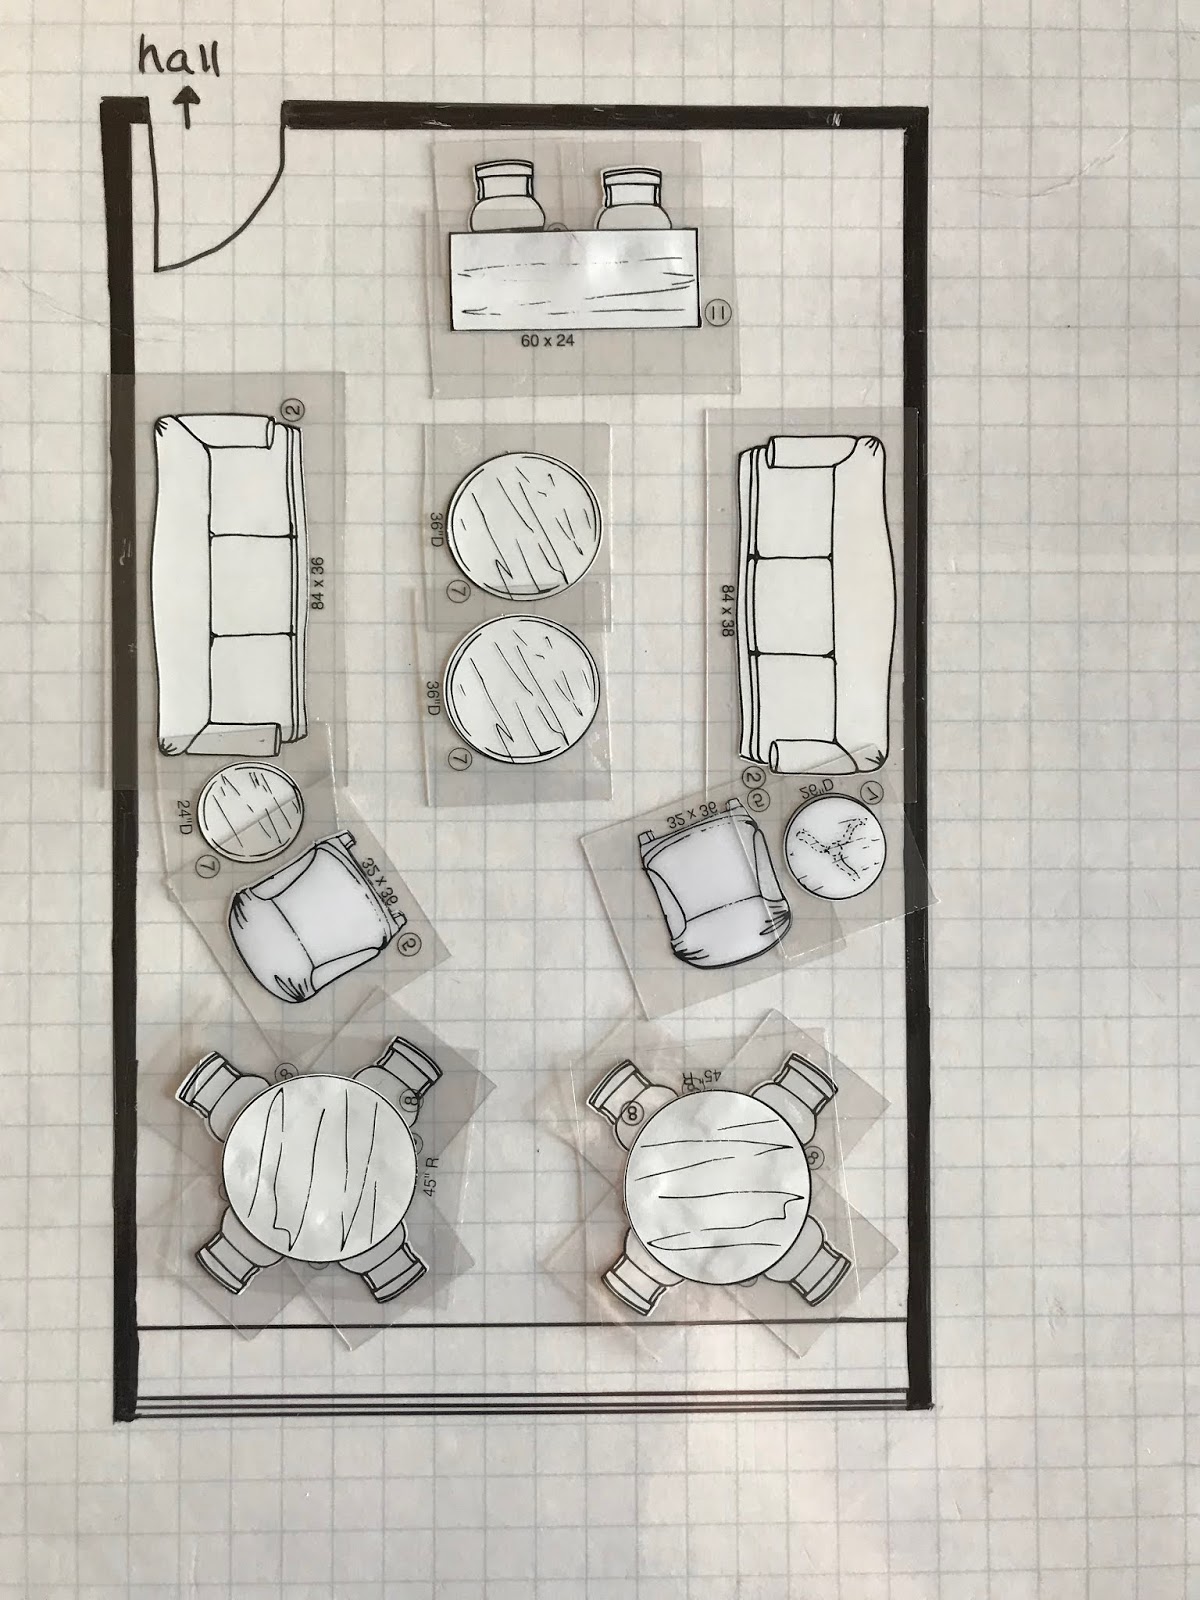
- Furniture templates (optional)

I don’t know about you, but I cannot purchase a clothing item without knowing my measurements.  If I blindly purchase a top without comparing my measurements to the retailers sizing chart, it is not likely the top will fit me.  If this happens often enough, I am disappointed and left feeling unmotivated to make any purchases that update my wardrobe.

In that same way, it is impossible to create a great space without first stopping to take measurements (otherwise known as a space plan). The purpose of a space plan is to show you what size items can fit in your space.  Having this guide helps you avoid purchasing pieces that are too large or too small.  A space plan also serves as your first look at a layout.  You can eyeball it on paper instead of moving furniture all around the room only to decide you don’t like how it looks.  On paper, you can create as many possible layouts as you like before deciding on the final placement of your furniture.

Step One- Measure the room.
Using your pencil, I recommend quickly sketching the room on your graph paper. Don’t worry if it is to scale. You can measure overall length and width, but you’ll have to get even more specific to note exact placement of windows and doors.  I tend to start in a corner of the room and work my way around by measuring each section.  Be sure to note which way a door opens (into the room versus out of the room), as this will make a difference on where items can be placed. Once your room is drawn out, you can go back and make note of where outlets and vents are located.  These notations will help you when it comes to placement later in the process.  Go ahead and measure the ceiling height.  You won’t need this immediately, but it’s good to note while doing all of your other measuring.

Your initial drawing will look like this, with each section of the room labeled with dimensions:
**DO NOT WORRY if yours is hand-drawn and a little messy at this point.  
You will have the opportunity to clean it up.


I recommend snapping photos of each wall in the space to reference throughout the rest of the space planning process.    Be sure to step back far enough that you can get the entire wall in your shot.  You can always go back and take close up detail shots of anything you feel is important. An added bonus in snapping pictures is that you will have “before” photos to show people once your project is complete.  Keep these in a place you can access remotely on your phone when out shopping- my personal favorite storage option is Dropbox. 

Now it is time to make the drawing to scale.  The reason behind drawing it a second time is to clean up any little errors made on the first drawing. I usually work in a ¼” scale which means ¼” on the paper = 1 ft in the room (and in the instance of ¼” graph paper- 1 square = 1 foot).   This is a popularly used scale so you should have no trouble finding graph paper or furniture templates to accommodate you.

There are many ways you can go about the drawing- You can redraw by hand on your graph paper using your scale or ruler, you can use space planning software.  This book comes with a ¼” graph printed on a dry erase material.  It allows for easy erasing when mistakes are made.  Using your tool of choice, draw out your room.  If you want to be very precise, you can show your walls as 4.5” thick and fill them in, but that is not required.
If any of your furnishings will be staying in the room, be sure to measure the length, width and height of those items.


Tuesday, November 6, 2018

Gathering the Facts for your Project- Patterns & Colors


Post 5/5 in the series Gathering the Facts for your Project

Well, we've come to the end of our line of questioning.  After you answer today's questions, you should have a clear picture of your project's parameters.

What patterns and colors appeal to you?  Which ones don’t?
Making a note of the colors and patterns you enjoy seeing within your space like will be helpful in keeping you focused while shopping.  The list of what you don’t like really is more important than what you do like.  This list of “don’ts” is the key to  how to avoid buying furnishings that just aren’t your style.

We’ve all done it- bought that CUTE top because the print looked so good on a friend.  But, ever since getting that shirt home and hanging it in the closet, it hasn’t seen the light of day.  The tags still hang from the sleeve, and likely always will.  Do you know why?  It’s because you bought a piece of clothing based on how it looked on someone else, not on you.    Do not make this kind of mistake when it comes to the pieces for your space.  Don’t get blinded by the way items look in a showroom.  Treat your color and pattern preference as guidelines, and you won’t make a purchasing mistake.

Remember, your home serves as the backdrop to your daily life.  It’s not the star of the show, don’t become a slave to it.  Make the pieces within your home work for you while making the space look good!

Having the answers to the questions we've discussed in the last month makes it easier to move forward with selecting the pieces for your project.  Every time you make a selection for the space, make sure it stacks up against your answers  before purchasing.  If it doesn’t, don’t force it, move on to find something else. You’ll be disappointed if you settle, so don’t!

I would love to hear from you on if these questions were helpful for you when planning your project.  Feel free to comment here OR email me liz@pdr-interiors.com.

-Liz